> ## Documentation Index
> Fetch the complete documentation index at: https://docs.tight.com/llms.txt
> Use this file to discover all available pages before exploring further.
# Stripe
> Automate the reconciliation between Stripe payouts and their itemized transactions with Tight
## Overview
Instead of building an integration with Stripe in-house, Tight communicates directly with Stripe on your behalf using
your [Stripe platform](https://stripe.com/docs/connect) account. This enables you to own the relationship between your
customer and Stripe, including any associated economic benefits, while getting a seamless invoicing user experience with
automatic payout reconciliation on the user's books.
## Automated Reconciliation
Stripe deposits money directly into your users' bank accounts on a regular cadence. When utilizing one of the Tight Bank
Transactions integrations, e.g. [Plaid](/integrations/banking/plaid), the bank deposit to the user's bank account will
also be ingested by the Tight API as part of that integration's bank feed. Importantly, Tight's algorithms automate the
reconciliation between that bank deposit and the itemized transactions within Stripe, saving your users time that would
have otherwise been spent manually reconciling these transactions in legacy accounting systems.
See the [**Invoice Payout Example**](/guides/business-owners/invoicing#invoice-payout-example) to understand the level
of complexity that Tight automates.
## Become a Stripe Platform
If you haven't already done so, you should [create a Stripe account](https://dashboard.stripe.com/register) for your
company/app. Once you have created a Stripe account, some admin-only confirmation is required:
### Enable Stripe Connect
Stripe Connect is what allows your app to facilitate payments so that your customers can accept invoice payments from
their clients.
#### Step 1: Create Stripe Account
After you have created your Stripe account,
you will want to enable Stripe Connect by clicking the "Get Started" button on
the [Connect tab of your Stripe dashboard](https://dashboard.stripe.com/test/connect/accounts/overview) and following
the steps.
Once you have activated Stripe Connect, you should navigate to the Connect settings screen, where you will be prompted
to
enter company-specific info, including your brand colors.
#### Step 2: Enable OAuth
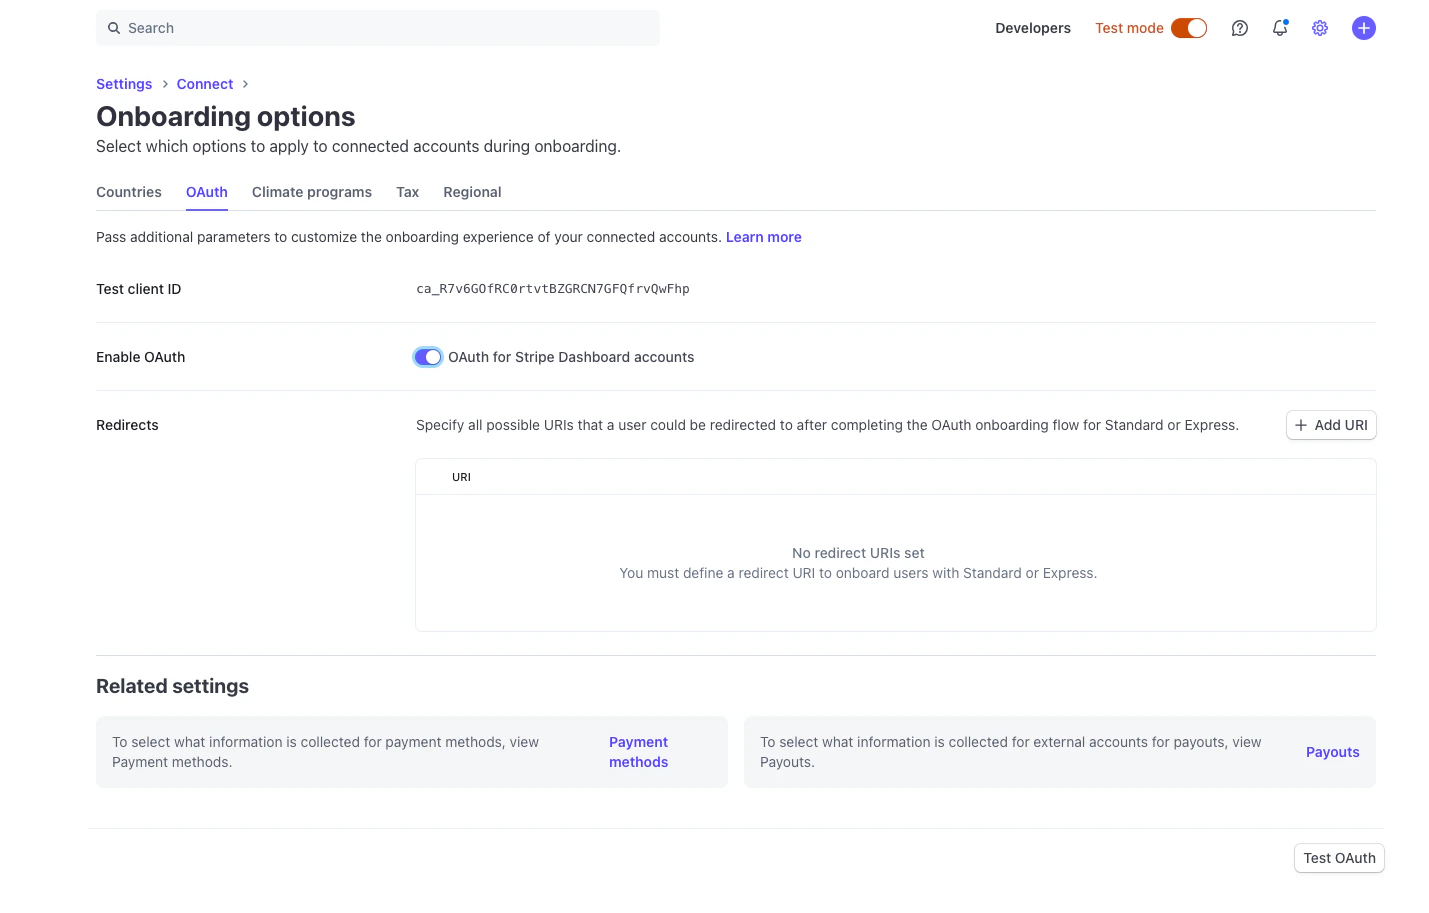
Once completed, on the top right of the header, you can click "Test mode", to toggle into the sandbox environment. Next,
you should navigate to the [Connect Settings screen](https://dashboard.stripe.com/settings/connect). From there, click
into "Onboarding options", then to the "OAuth" tab. Toggle on the "Enable OAuth" option.
 #### Step 3: Configure Redirects
Next, under "Redirects", you should add `https://redirect.sandbox.hurdlr.com/integrations/stripe`.
Please note down the "Test client ID".
#### Step 4: Production Setup
Once you are ready to go live in the "Production" environment, on the top right of the header, you can disable the "Test
mode" toggle, and repeat the above steps. Under "Redirects", you should add
`https://redirect.prod.hurdlr.com/integrations/stripe`.
### Connect Tight Webhook URLs to Stripe (Real-Time Updates)
By subscribing the Tight API to receive webhooks on your Stripe dashboard, Tight will be able to pull in updates to your
users' invoice updates in real-time.
To do so, in your Stripe Dashboard, click on Developer -> Webhooks.
#### Step 3: Configure Redirects
Next, under "Redirects", you should add `https://redirect.sandbox.hurdlr.com/integrations/stripe`.
Please note down the "Test client ID".
#### Step 4: Production Setup
Once you are ready to go live in the "Production" environment, on the top right of the header, you can disable the "Test
mode" toggle, and repeat the above steps. Under "Redirects", you should add
`https://redirect.prod.hurdlr.com/integrations/stripe`.
### Connect Tight Webhook URLs to Stripe (Real-Time Updates)
By subscribing the Tight API to receive webhooks on your Stripe dashboard, Tight will be able to pull in updates to your
users' invoice updates in real-time.
To do so, in your Stripe Dashboard, click on Developer -> Webhooks.
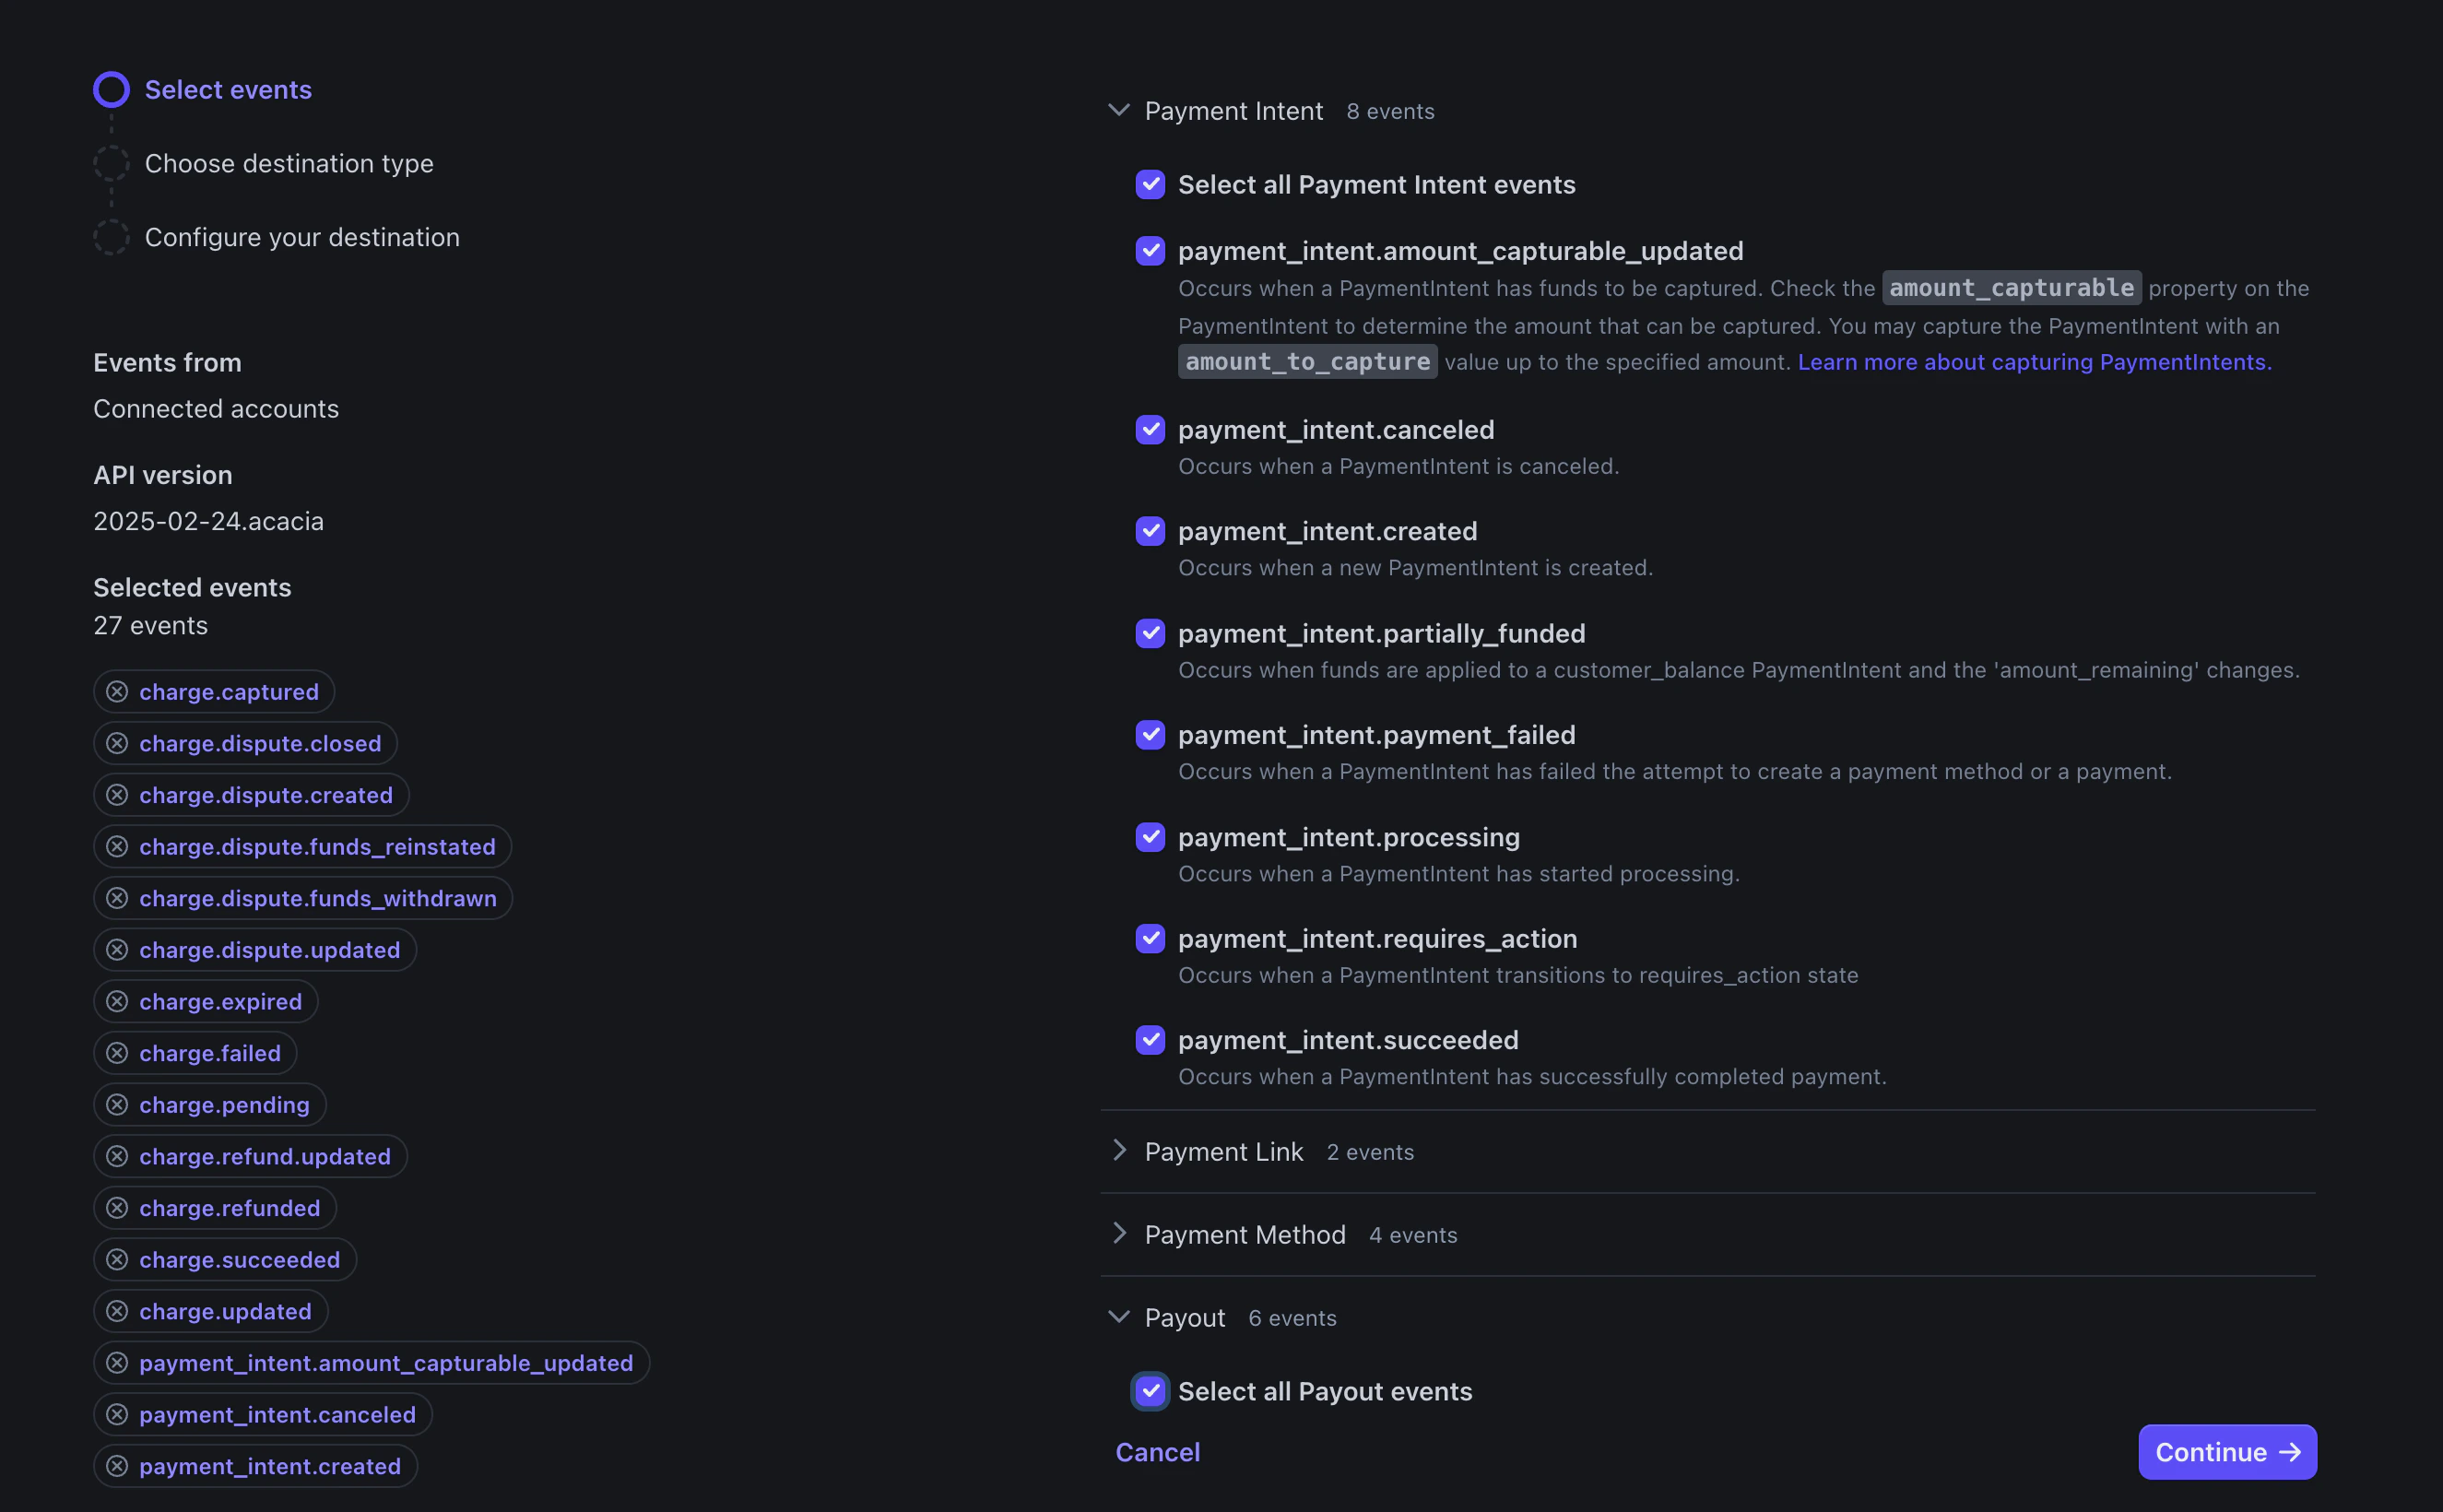
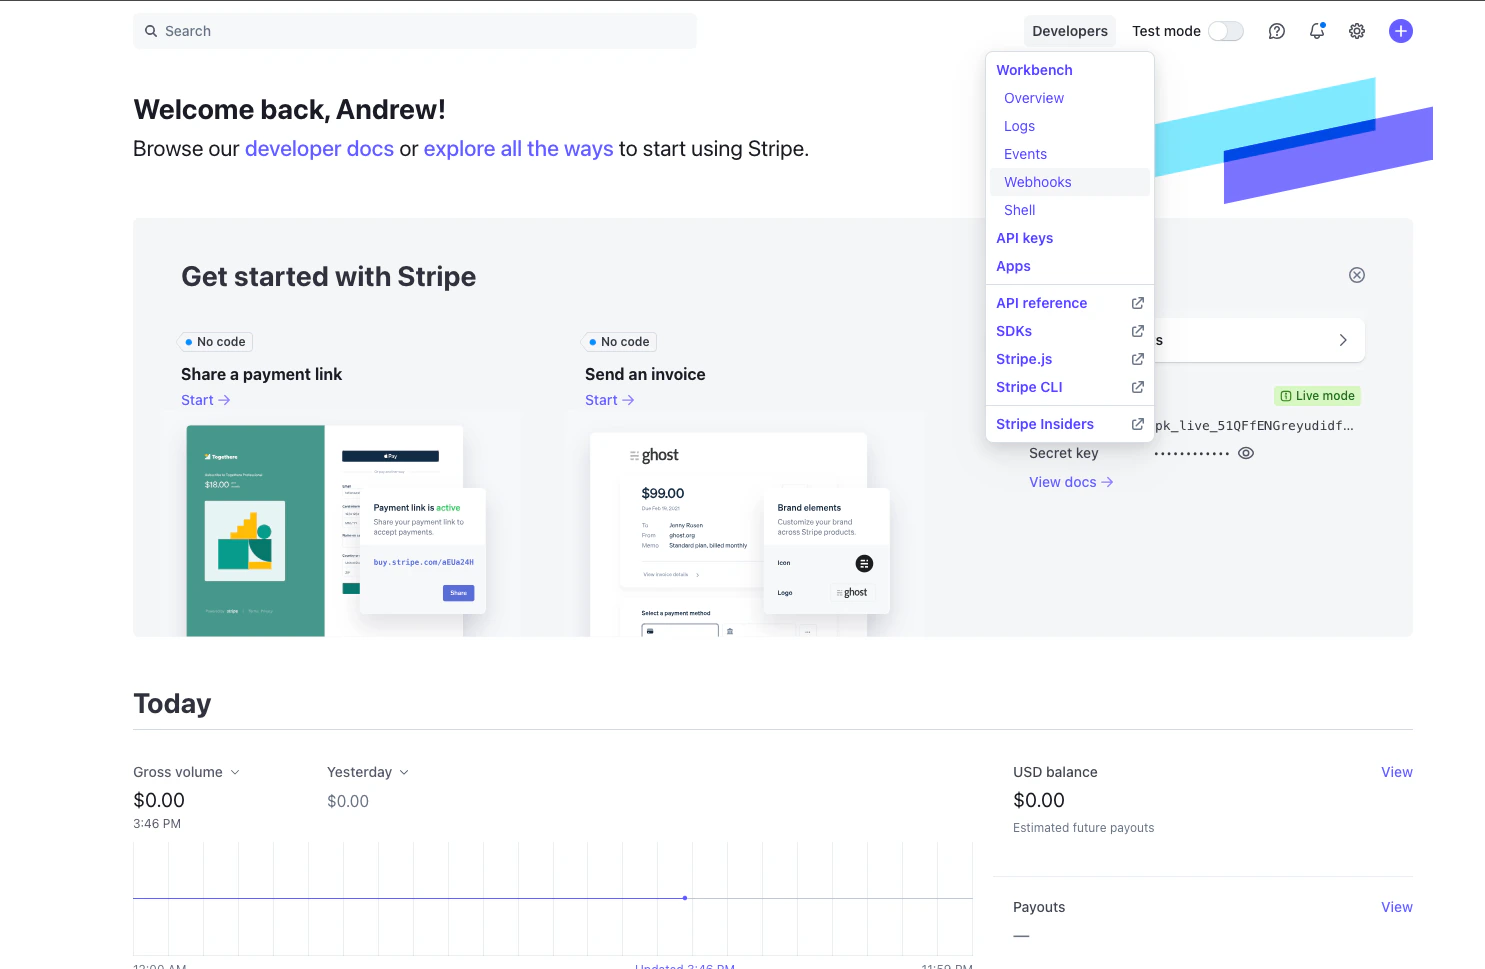 Then, click into "Add endpoint". Under the "Select events" section, be sure to select all the "Charge", "Payment
Intent", and "Payout" events, then click "Continue".
Then, click into "Add endpoint". Under the "Select events" section, be sure to select all the "Charge", "Payment
Intent", and "Payout" events, then click "Continue".
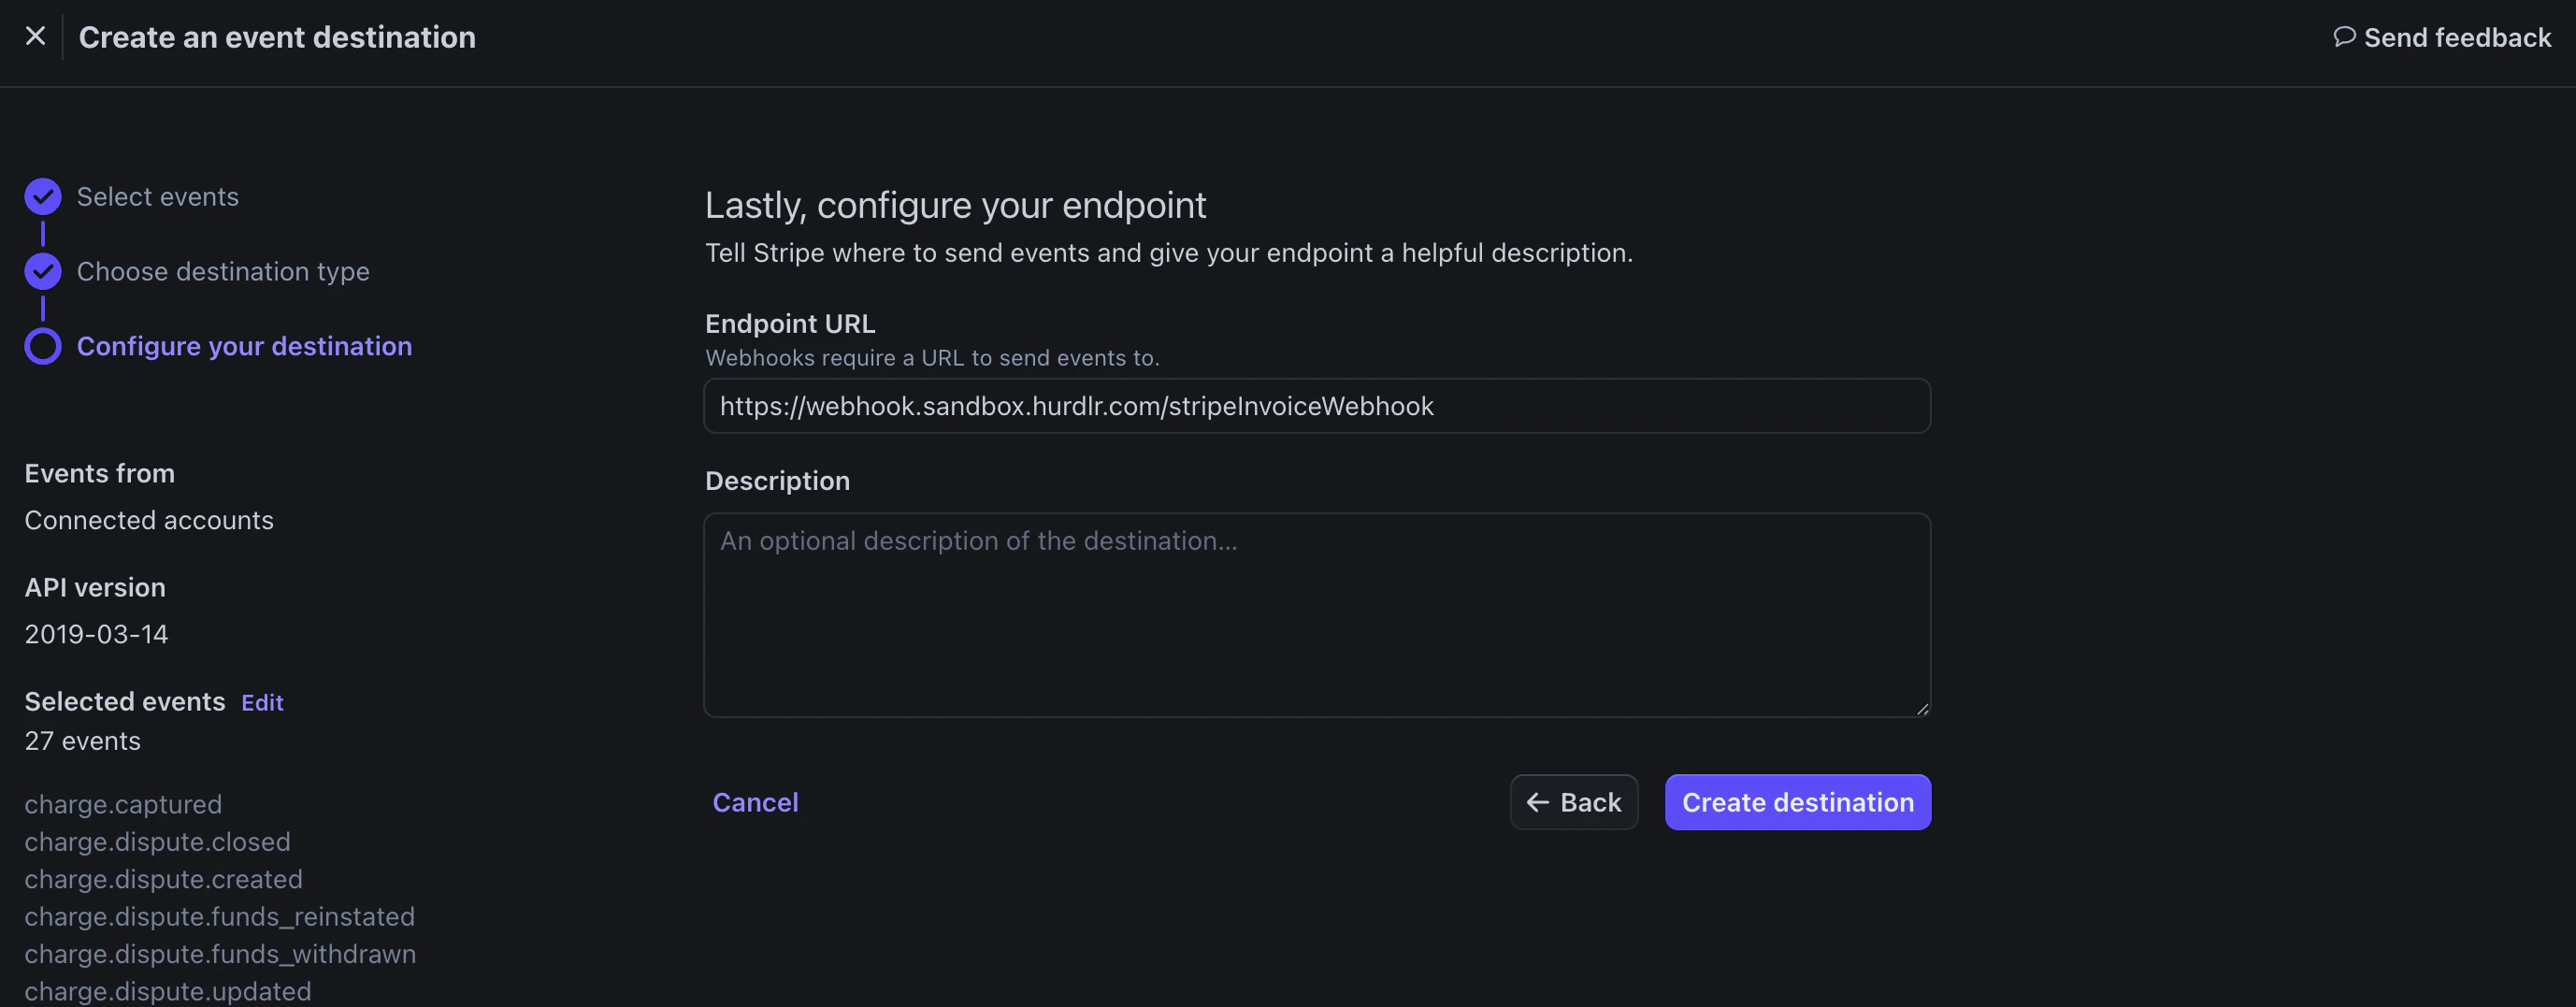
 Finally, you will add your Tight Webhook URL for the Sandbox environment or your Webhook URL for the Production
environment, and finish by clicking "Create destination".
For Test mode, add `https://webhook.sandbox.hurdlr.com/stripe`.
For Live mode, add `https://webhook.prod.hurdlr.com/stripe`.
Finally, you will add your Tight Webhook URL for the Sandbox environment or your Webhook URL for the Production
environment, and finish by clicking "Create destination".
For Test mode, add `https://webhook.sandbox.hurdlr.com/stripe`.
For Live mode, add `https://webhook.prod.hurdlr.com/stripe`.
 ## Securely share your Stripe keys
The last field that is needed is a "Secret key", which you can find on
the [API keys](https://dashboard.stripe.com/test/apikeys) page. Under the "Standard keys" section, you will see a "
Secret key" row. You should note down the `token` field for the Secret key.
Once collected, use the Tight API to [configure your Stripe integration](/api-reference/integrations/configure-stripe).
## Connect your user's Stripe accounts
There are three primary ways to connect your users' Stripe accounts to their company in Tight:
1. For partners including Payment Processing linkage from their own UX, use
the [Start Stripe Flow API](/api-reference/integration-management/start-stripe-flow) which wraps the entire OAuth 2.0
flow such that you simply need to redirect your user to a single URL
2. Tight's Embedded UI also provides UX from which users can kick off the Stripe connection flow, e.g. when onboarding
in the [Invoice Dashboard](/embeddable-ui/react/invoicing/invoice-dashboard)
3. For partners with existing Stripe
integrations, [programmatically link the user's Stripe account](/api-reference/integration-management/link-stripe)
## Securely share your Stripe keys
The last field that is needed is a "Secret key", which you can find on
the [API keys](https://dashboard.stripe.com/test/apikeys) page. Under the "Standard keys" section, you will see a "
Secret key" row. You should note down the `token` field for the Secret key.
Once collected, use the Tight API to [configure your Stripe integration](/api-reference/integrations/configure-stripe).
## Connect your user's Stripe accounts
There are three primary ways to connect your users' Stripe accounts to their company in Tight:
1. For partners including Payment Processing linkage from their own UX, use
the [Start Stripe Flow API](/api-reference/integration-management/start-stripe-flow) which wraps the entire OAuth 2.0
flow such that you simply need to redirect your user to a single URL
2. Tight's Embedded UI also provides UX from which users can kick off the Stripe connection flow, e.g. when onboarding
in the [Invoice Dashboard](/embeddable-ui/react/invoicing/invoice-dashboard)
3. For partners with existing Stripe
integrations, [programmatically link the user's Stripe account](/api-reference/integration-management/link-stripe)