> ## Documentation Index
> Fetch the complete documentation index at: https://docs.tight.com/llms.txt
> Use this file to discover all available pages before exploring further.
# Connecting Stripe Accounts
## Create your Stripe App
If you haven't already done so, you should [create a Stripe account](https://dashboard.stripe.com/register) for your company/app.
## Configure your Stripe Integration
### Enable Stripe Connect
Stripe Connect is what allows your app to facilitate payments so that your customers can accept invoice payments from their clients. After you have created your Stripe account, you will want to enable Stripe Connect by clicking the "Get Started" button on the [Connect tab of your Stripe dashboard](https://dashboard.stripe.com/test/connect/accounts/overview) and following the steps.
Once you have activated Stripe Connect, you should navigate to the Connect settings screen where you will be prompted to enter company-specific info, including your brand colors.
Once completed, on the top right of the header, you can click "Test mode", to toggle into the sandbox environment. Next, you should navigate to the [Connect Settings screen](https://dashboard.stripe.com/settings/connect). From there, click into "Onboarding options", then to the "OAuth" tab. Toggle on the "Enable OAuth" option.
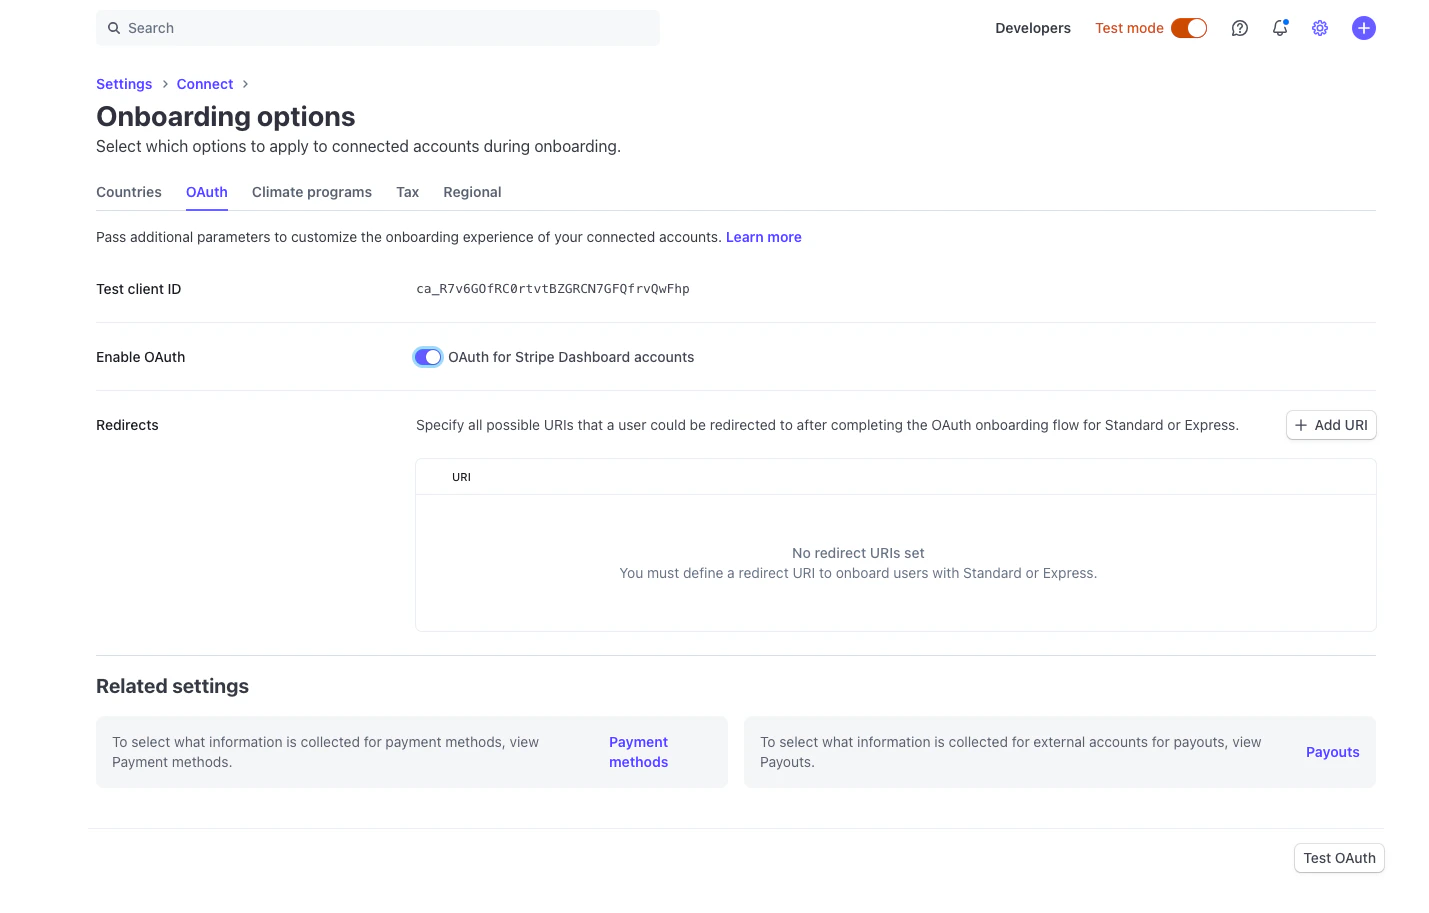 Next, under "Redirects", you should add `https://redirect.sandbox.hurdlr.com/integrations/stripe/YOUR_TIGHT_CLIENT_ID`.
Please note down the "Test client ID".
Once you are ready to go live in in the "Production" environment, on the top right of the header, you can disable the "Test mode" toggle, and repeat the above steps. Under "Redirects", you should add `https://redirect.prod.hurdlr.com/integrations/stripe/YOUR_TIGHT_CLIENT_ID`.
### Connect Tight Webhook URLs to Stripe (Real-Time Updates)
By subscribing the Tight API to receive webhooks on your Stripe dashboard, Tight will be able to pull in updates to your users' invoice updates in real-time.
To do so, in your Stripe Dashboard, click on Developer -> Webhooks.
Next, under "Redirects", you should add `https://redirect.sandbox.hurdlr.com/integrations/stripe/YOUR_TIGHT_CLIENT_ID`.
Please note down the "Test client ID".
Once you are ready to go live in in the "Production" environment, on the top right of the header, you can disable the "Test mode" toggle, and repeat the above steps. Under "Redirects", you should add `https://redirect.prod.hurdlr.com/integrations/stripe/YOUR_TIGHT_CLIENT_ID`.
### Connect Tight Webhook URLs to Stripe (Real-Time Updates)
By subscribing the Tight API to receive webhooks on your Stripe dashboard, Tight will be able to pull in updates to your users' invoice updates in real-time.
To do so, in your Stripe Dashboard, click on Developer -> Webhooks.
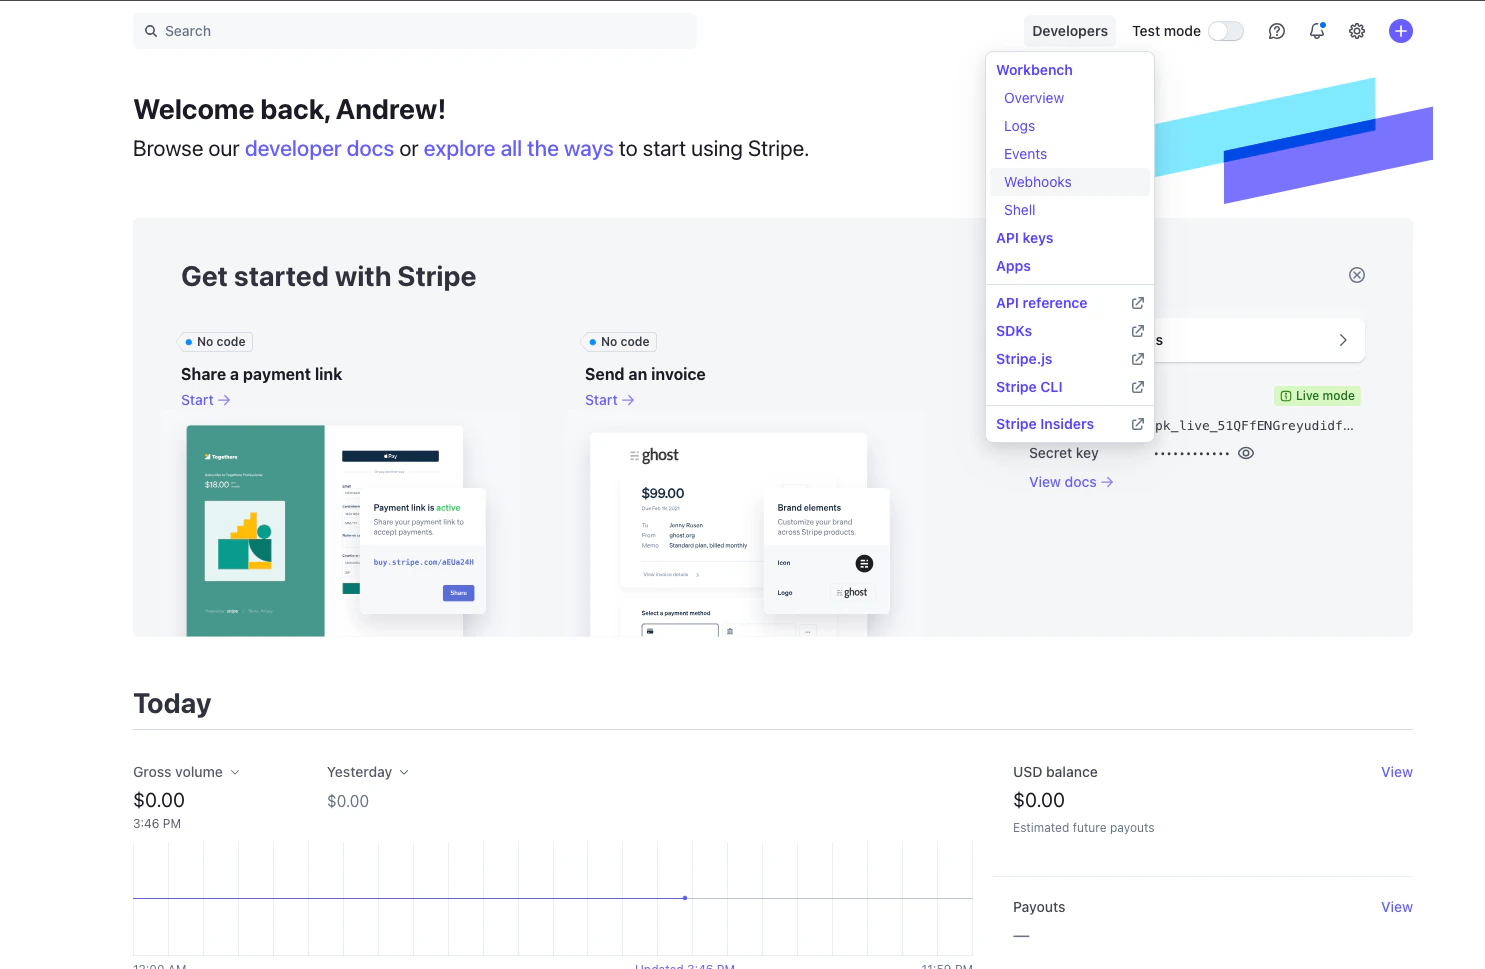 Then, click into "Add endpoint". Under the "Select events" section, be sure to select all the "Charge", "Payment Intent" and "Payout" events, then click "Continue".
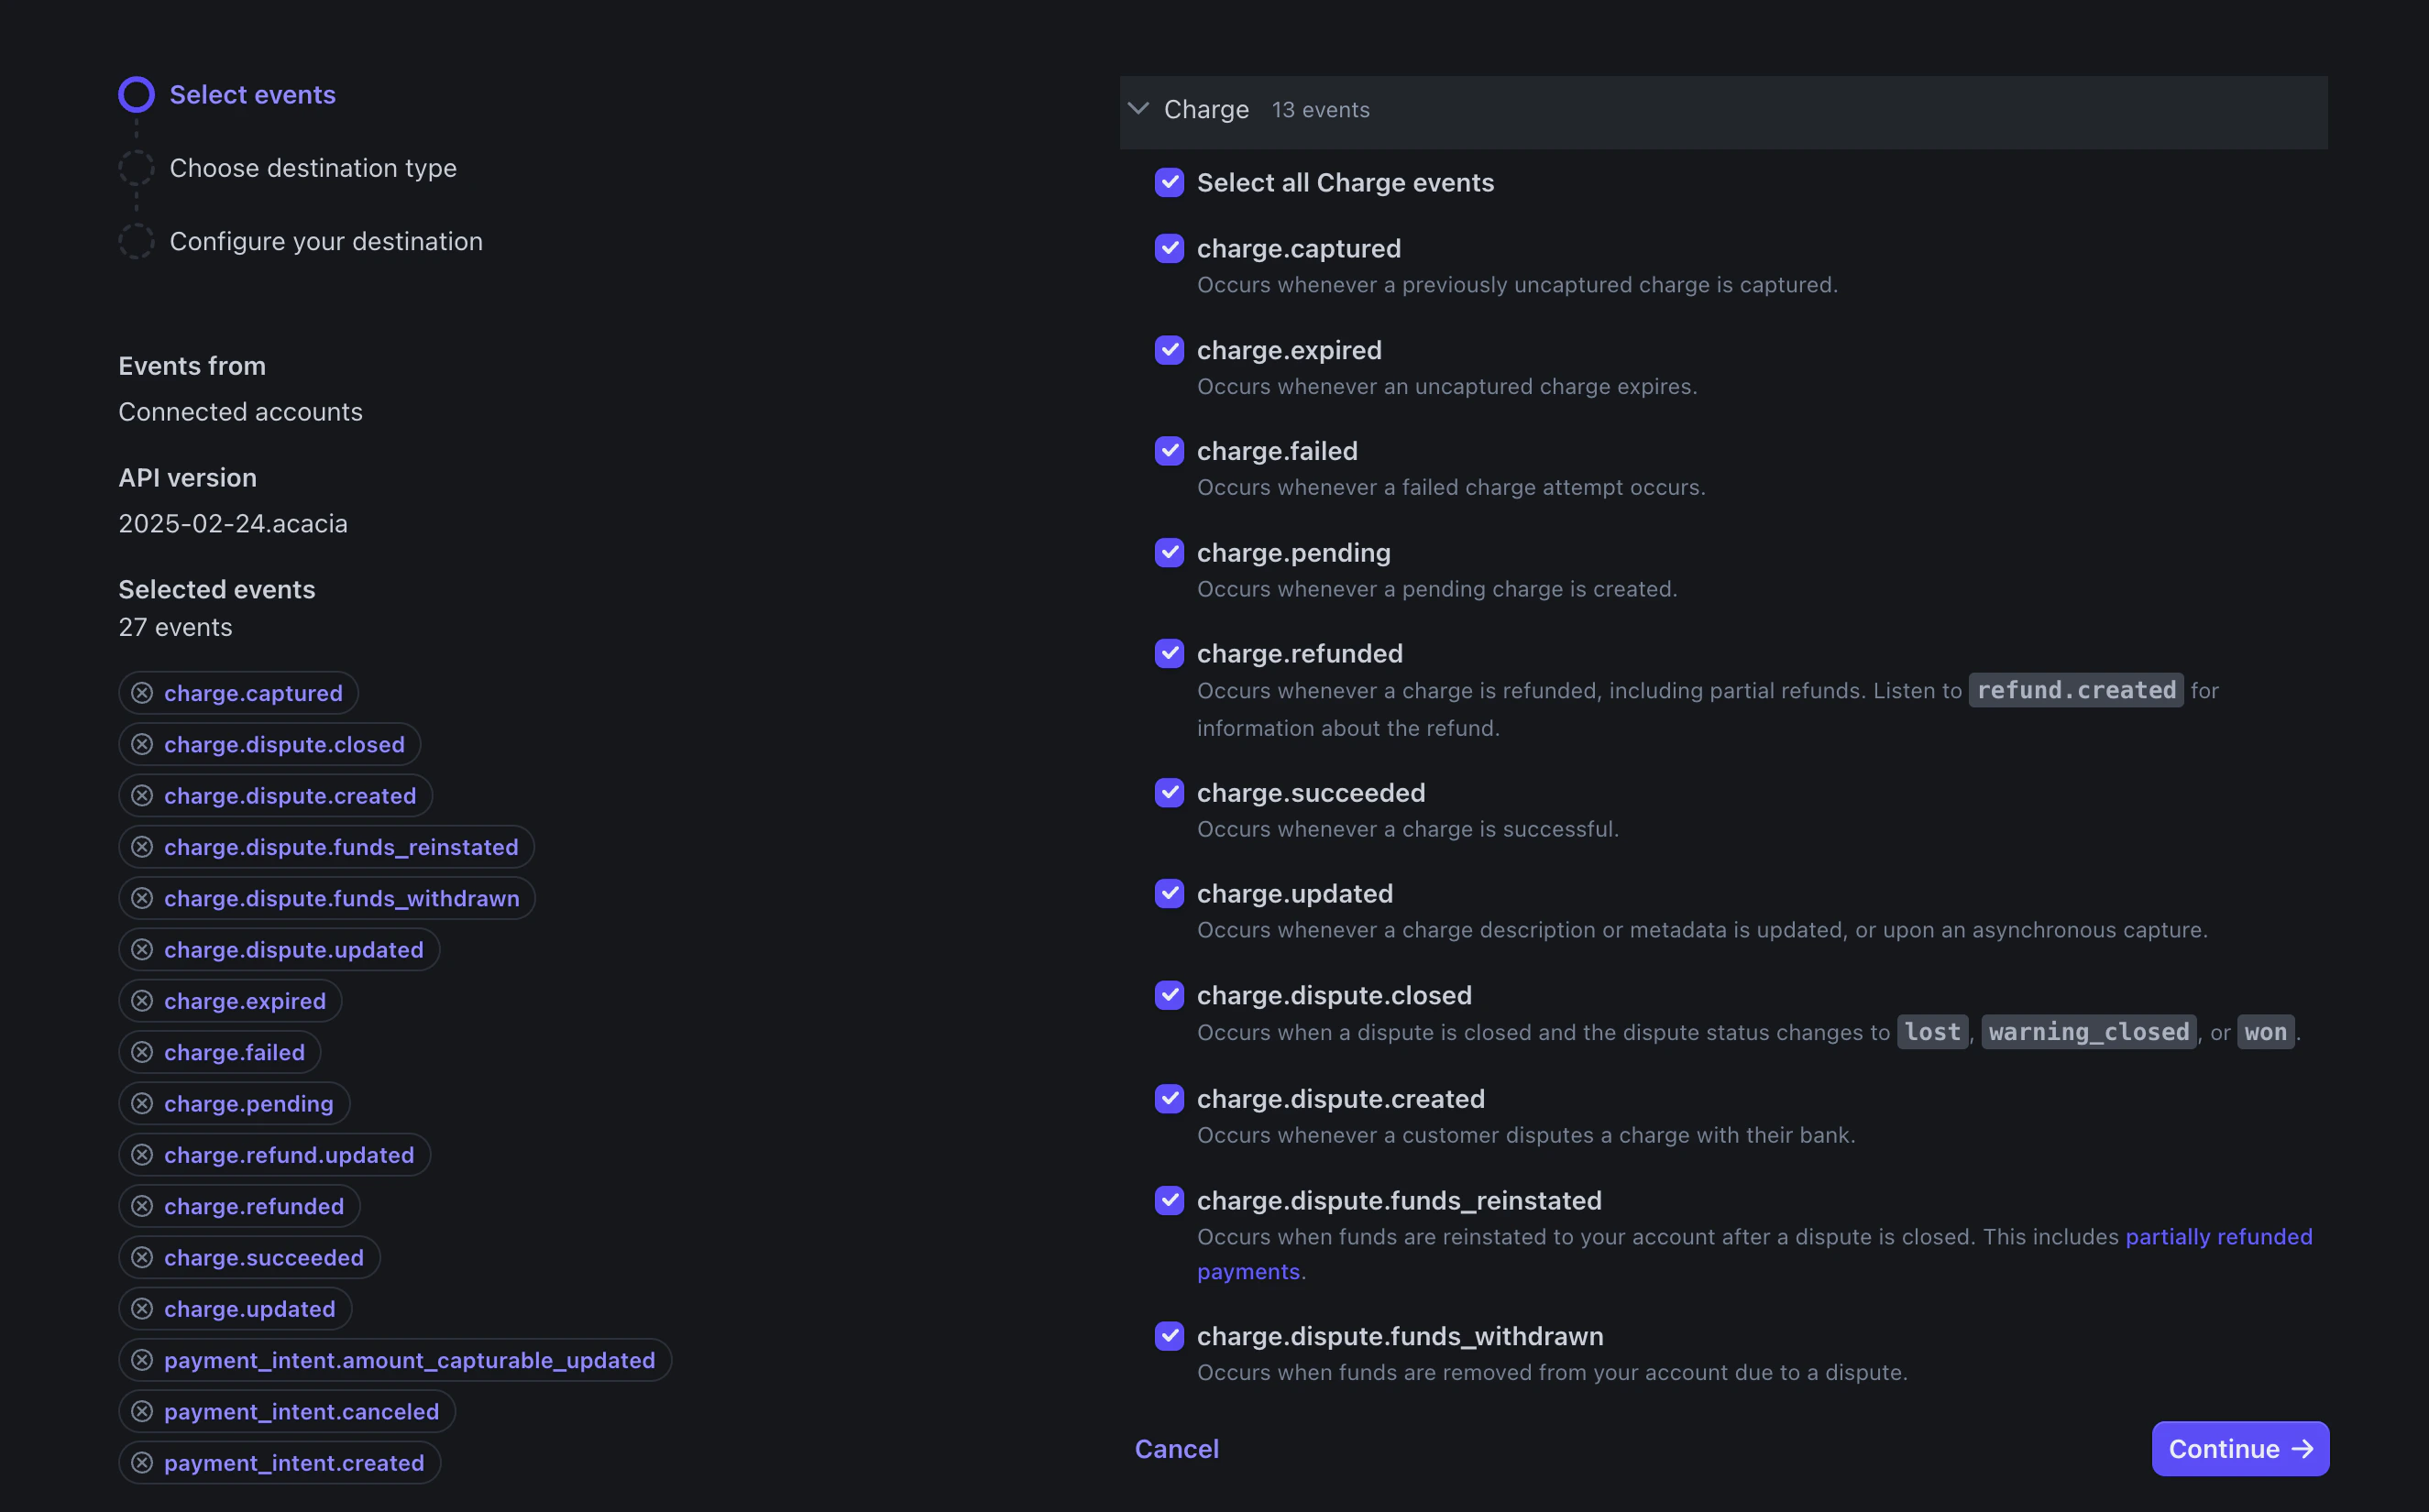
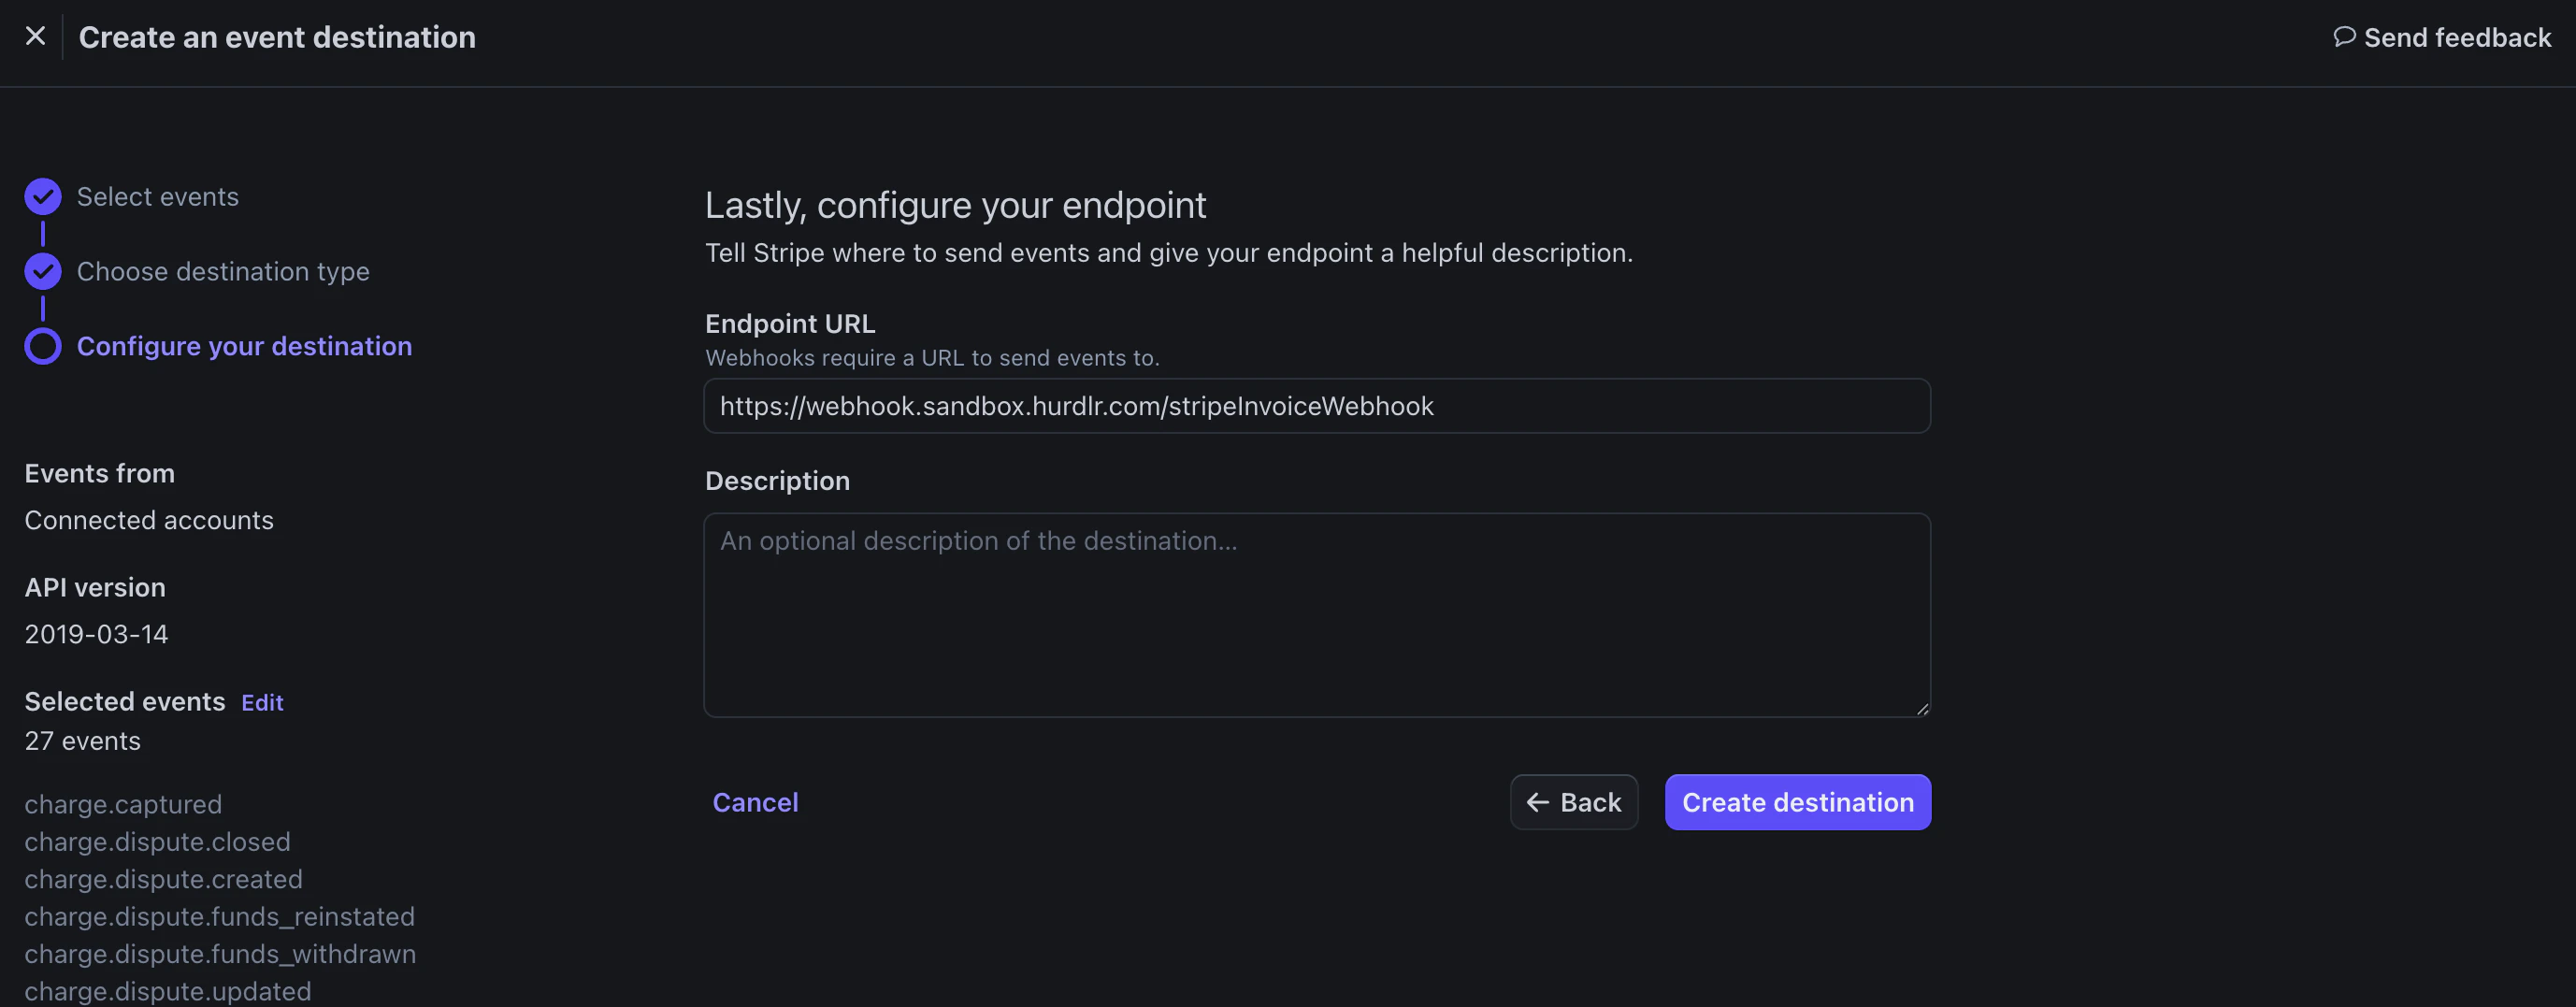
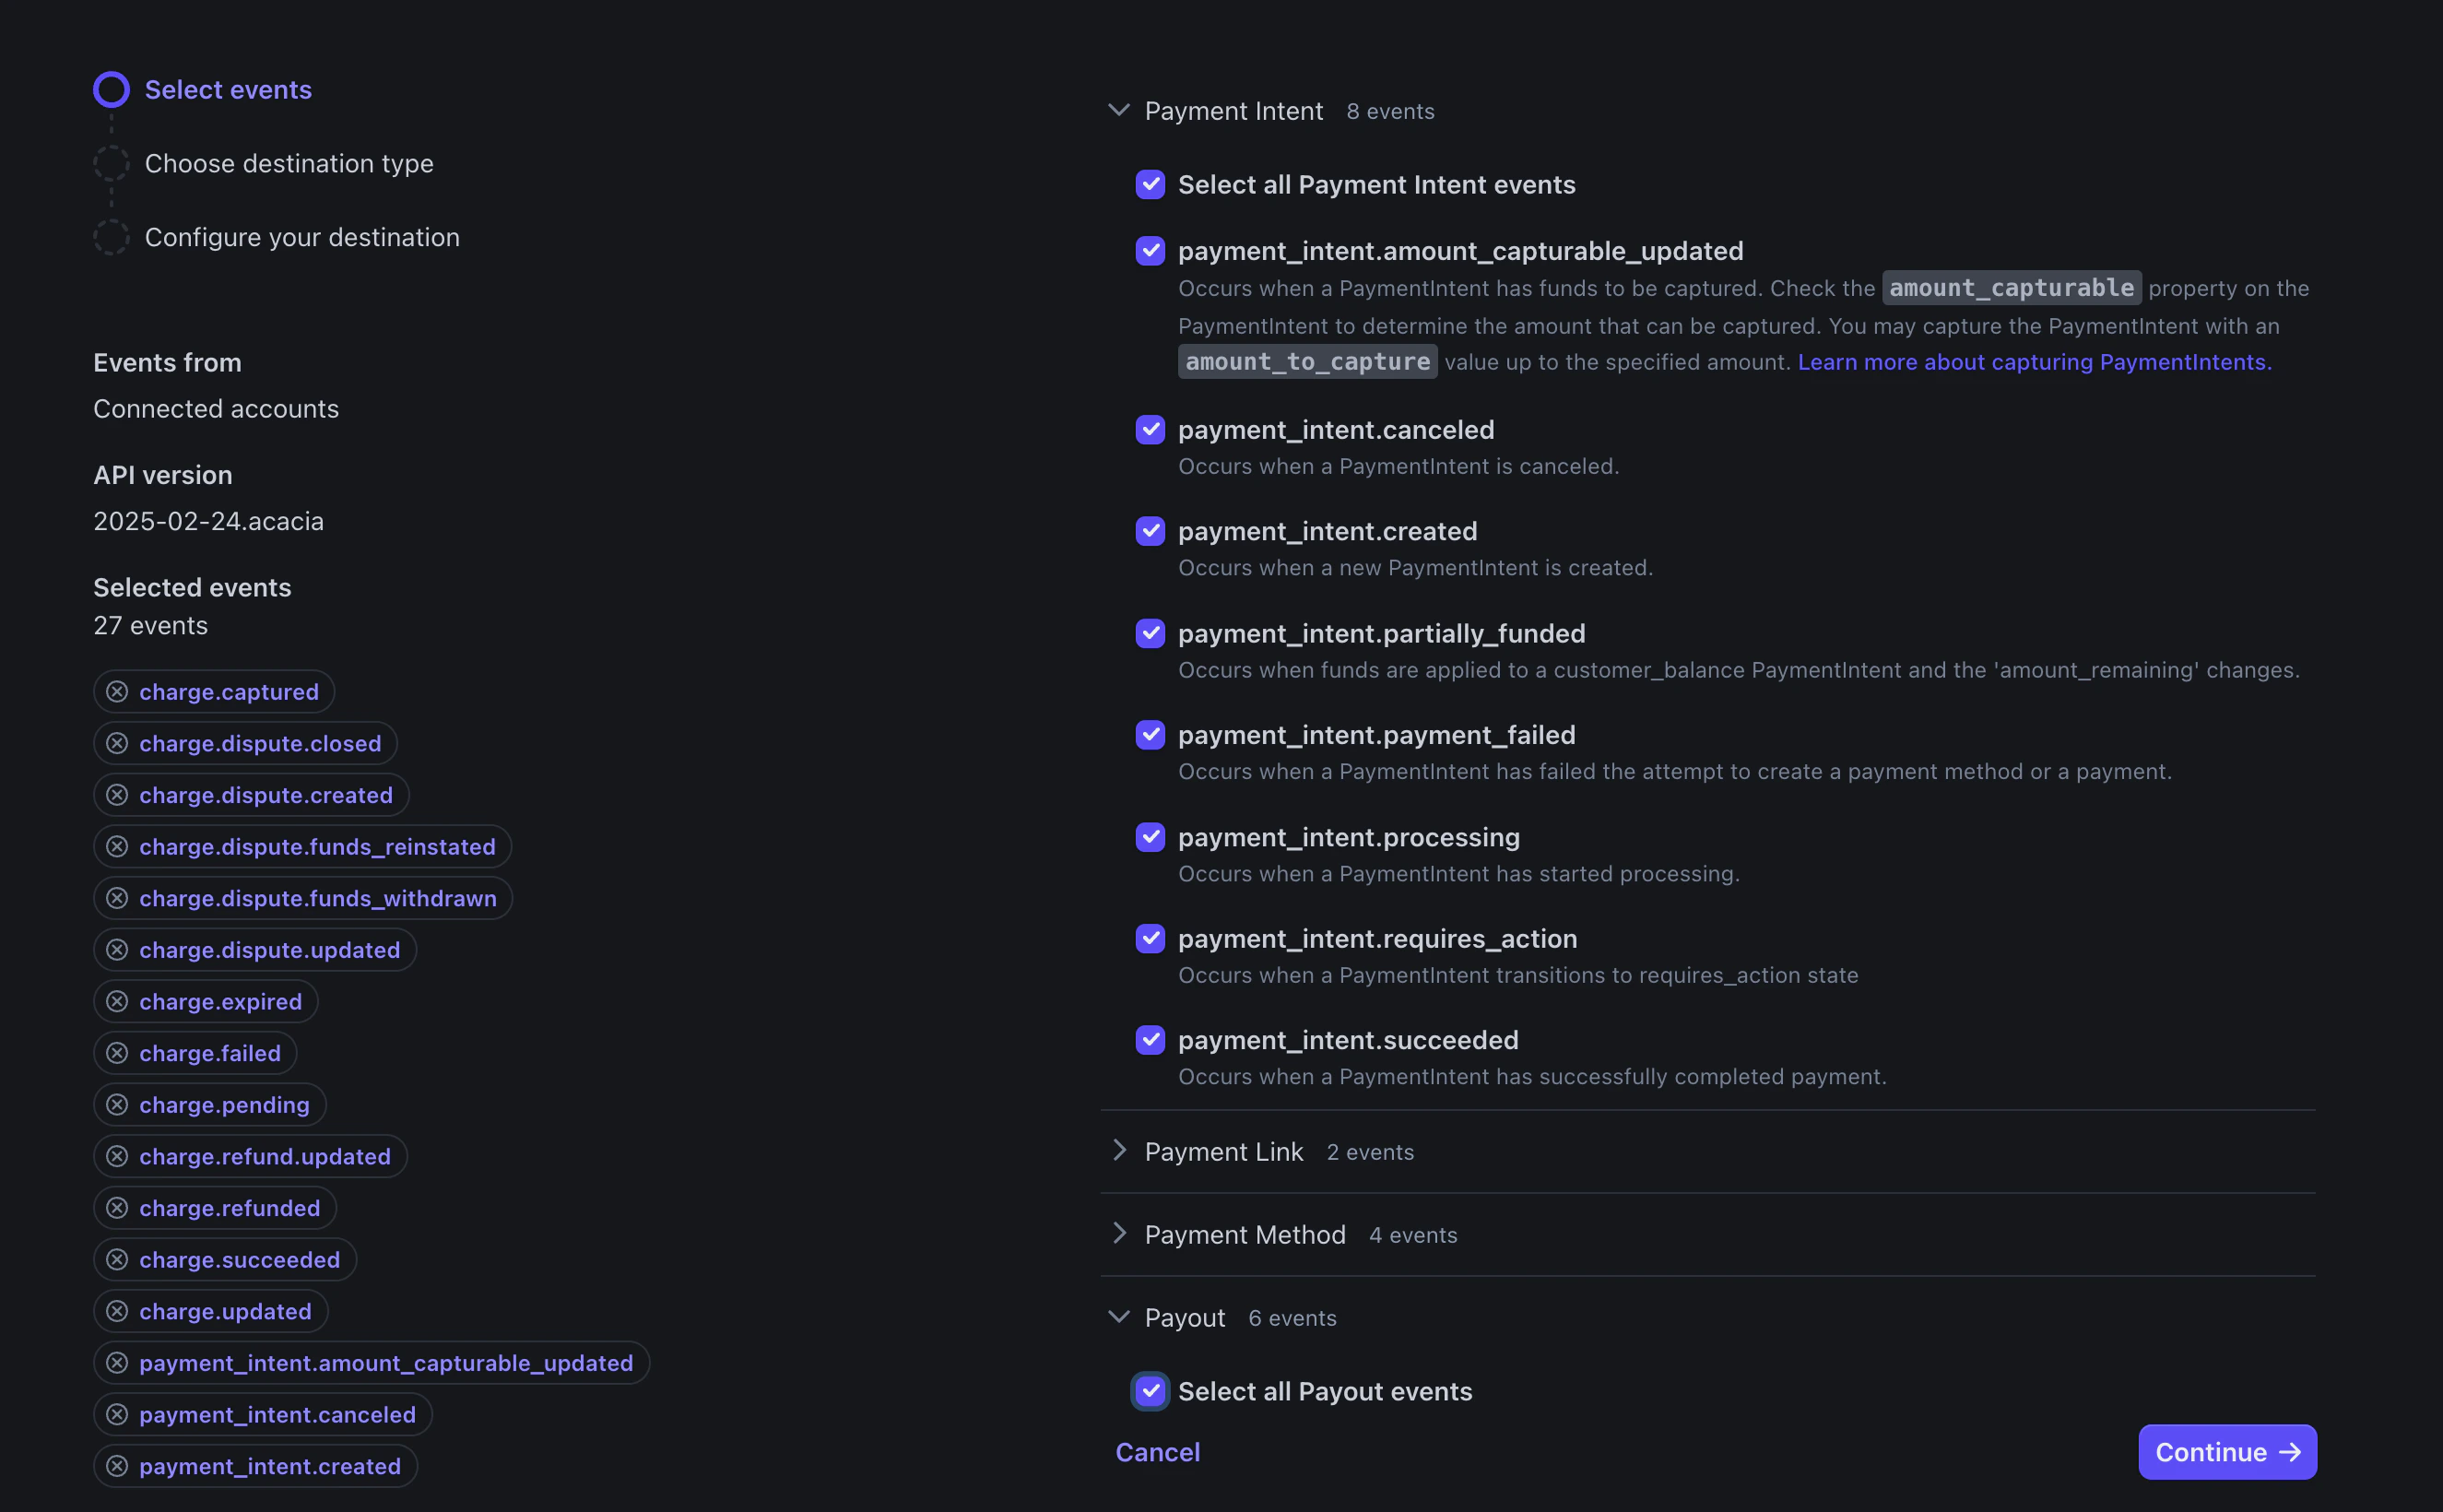 Finally, you will add your Tight Webhook URL for the Sandbox environment or your Webhook URL for the Production environment, and finish by clicking "Create destination".
For Test mode, add `https://webhook.sandbox.hurdlr.com/stripeInvoiceWebhook`
For Live mode, add `https://webhook.hurdlr.com/stripeInvoiceWebhook`
Finally, you will add your Tight Webhook URL for the Sandbox environment or your Webhook URL for the Production environment, and finish by clicking "Create destination".
For Test mode, add `https://webhook.sandbox.hurdlr.com/stripeInvoiceWebhook`
For Live mode, add `https://webhook.hurdlr.com/stripeInvoiceWebhook`
 You will then be navigated to your Webhooks Dashboard where you can view webhook activity.
## Securely share your Stripe keys
The last field that is needed is a "Secret key", which you can find on the [API keys](https://dashboard.stripe.com/test/apikeys) page. Under the "Standard keys" section, you will see a "Secret key" row. You should note down the `token` field for the Secret key.
Contact us directly at [api@tight.com](mailto:api@tight.com) for instructions on how to securely share:
1. the Secret key token above
2. the Test mode client ID that you noted down at the end of [Step 3](/v5.0/integrations/payment-processing/stripe/integrating-stripe#3-enable-stripe-connect)
## Linking your users' Stripe accounts
The Tight API makes it simple to link your user's Stripe accounts. All you need to do is add a CTA to link Stripe in your user experience that hits the Tight API's [POST /integration](/v5.0/integrations/overview) endpoint under the hood. The response from that endpoint contains a `url` to which you should route your user to kick of the OAuth 2.0 flow. After that, the Tight API handles the remainder of the flow with Stripe, with the end result being a successfully linked Stripe account and the corresponding transaction data flowing directly into the Tight API.
You will then be navigated to your Webhooks Dashboard where you can view webhook activity.
## Securely share your Stripe keys
The last field that is needed is a "Secret key", which you can find on the [API keys](https://dashboard.stripe.com/test/apikeys) page. Under the "Standard keys" section, you will see a "Secret key" row. You should note down the `token` field for the Secret key.
Contact us directly at [api@tight.com](mailto:api@tight.com) for instructions on how to securely share:
1. the Secret key token above
2. the Test mode client ID that you noted down at the end of [Step 3](/v5.0/integrations/payment-processing/stripe/integrating-stripe#3-enable-stripe-connect)
## Linking your users' Stripe accounts
The Tight API makes it simple to link your user's Stripe accounts. All you need to do is add a CTA to link Stripe in your user experience that hits the Tight API's [POST /integration](/v5.0/integrations/overview) endpoint under the hood. The response from that endpoint contains a `url` to which you should route your user to kick of the OAuth 2.0 flow. After that, the Tight API handles the remainder of the flow with Stripe, with the end result being a successfully linked Stripe account and the corresponding transaction data flowing directly into the Tight API.